Store Creation
Overview
The Store Creation process in Seekora is a comprehensive 7-step wizard that guides you through setting up a new store from scratch. This step-by-step process ensures that your store is properly configured with all necessary information, data sources, search parameters, and display settings. The creation wizard is designed to be user-friendly while providing powerful customization options for your specific business needs.
Why Create a New Store?
Creating a new store allows you to:
-
Test Configurations - Build test environments without affecting existing stores
-
Establish New Business Locations - Set up separate stores for different physical or virtual locations
-
Launch New Product Lines - Create dedicated stores for different product categories or brands
-
Customize Search Experience - Tailor search functionality for specific audiences or use cases
Business Benefits:
- Isolated Environments: Each store maintains separate data and configurations
- Customized User Experience: Design search interfaces specific to your target audience
- Flexible Data Management: Import and manage different datasets per store
- Industry-Specific Setup: Configure stores based on your specific industry requirements
Step-by-Step Store Creation Process
Step 1: Store Information
The first step collects basic information about your store:

Required Fields:
Fields marked with * are mandatory and must be completed before proceeding to the next step.
| Field | Description | Requirements |
|---|---|---|
| Store Name * | Unique identifier for your store that will appear in the dashboard and navigation | *Required field - Must be unique across your account |
| Store Type * | Dropdown selection that determines the store's primary business model (e.g., Online Store, Physical Store) | *Required field - Select from predefined options |
| Store Description | Optional description providing additional context about the store's purpose or target audience | Optional field - Helpful for organization and identification |
Step 2: Industry Information
Select the industry that best describes your business:
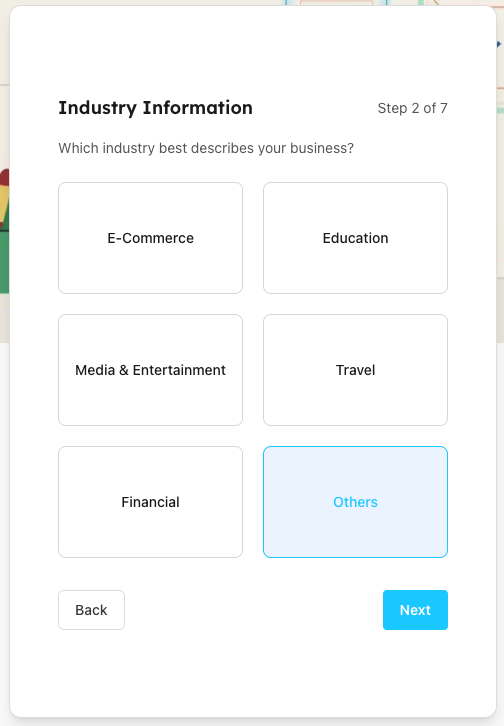
Available Industry Categories:
| Industry | Use Cases & Benefits |
|---|---|
| E-Commerce | Online retail stores, product catalogs, shopping platforms with product search and filtering capabilities |
| Education | Educational institutions, course catalogs, learning management systems, academic content search |
| Media & Entertainment | Content libraries, streaming platforms, digital media catalogs, entertainment content search |
| Travel | Travel booking platforms, destination search, accommodation and activity discovery |
| Financial | Financial services, product comparisons, investment platforms, banking solutions |
| Others | Custom industries or specialized use cases not covered by the standard categories |
Selection Impact:
- Please select your model carefully, as it may affect your search results and recommendations.
Step 3: Import Your Own Data
Upload your custom dataset to populate your store:
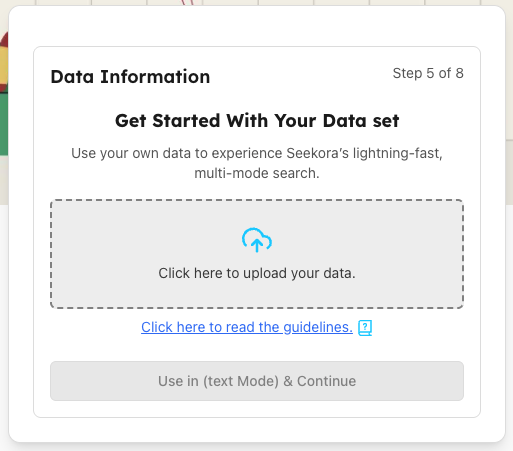
Custom Data Upload Process:
Get Started With Your Data Set
- Purpose: Use your own data to experience Seekora's lightning-fast, multi-mode search
- Upload Method: Click to upload your data files or drag and drop
- Guidelines: Click "Click here to read the guidelines" for data format requirements
- Support: Comprehensive documentation available for data preparation
Data Upload Options:
| Upload Method | Description | Supported Formats |
|---|---|---|
| Click to Upload | Click the upload area to browse and select your data files from your computer | JSON, CSV, XML formats supported |
| Drag & Drop | Drag your data files directly into the upload area for quick and easy upload | Multiple file upload supported |
| Guidelines Access | Access comprehensive data formatting guidelines and best practices for optimal results | Documentation and examples provided |
Important Notes for Custom Data:
- Data Format: Ensure your data follows the supported formats and structure guidelines
- File Size: Maximum file size limit is 50 MB. Consider breaking large datasets into smaller chunks if needed
- Record Size: Each individual record can be increased beyond 200 KB based on your plan specifications to ensure optimal processing
- Data Quality: Clean, well-structured data provides better search results
- Processing Time: Custom data may take longer to process compared to sample datasets
Step 3A: Custom Data Confirmation
After uploading your custom data, the system processes and validates it:
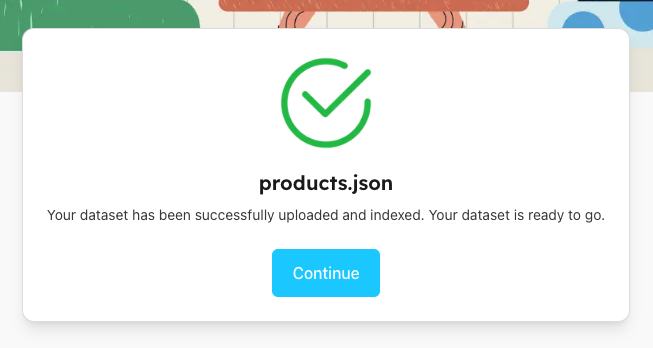
Custom Import Process:
- File Upload: Your custom dataset is uploaded to Seekora's servers.
- Data Validation: System checks data format and structure compatibility.
- Indexing: Custom data is processed and indexed for search optimization.
- Confirmation: Success message displays with your uploaded file name.
- Ready Status: Store is prepared for configuration steps.
Note: After this step, the process continues with the same steps as sample data (Steps 5-7: Design Search Display, Configure Search Attributes, and Configure Result Ordering).
Alternative Path: Use Sample Dataset
If you prefer to start with pre-configured data, you can choose from available sample datasets:
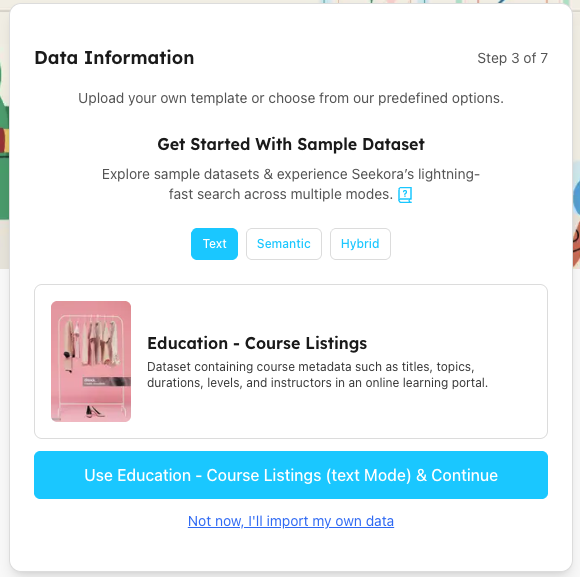
Data Configuration Options:
Get Started With Sample Dataset
- Purpose: Explore Seekora's capabilities with pre-configured data
- Benefits:
- Quick setup and immediate testing
- Industry-specific sample data
- Pre-configured search attributes
- Lightning-fast search experience across multiple modes
Sample Dataset Example: Education - Course Listings
- Content: Course metadata including titles, topics, durations, levels, and instructors
- Industry: Online learning portals and educational platforms
- Search Modes: Text, Semantic, and Hybrid search capabilities
Interactive Search Mode Selection:
The interface allows you to select from three different search modes, each optimized for different use cases:
Available Search Modes:
- Text Mode: Traditional keyword-based search for exact matches and text similarity
- Semantic Mode: AI-powered search that understands context and meaning behind queries
- Hybrid Mode: Combines both text and semantic search for comprehensive results
Dynamic Button Behavior: The blue action button at the bottom dynamically updates based on your selected search mode:
- When Text is selected: Button shows "Use Education - Course Listings (text Mode) & Continue"
- When Semantic is selected: Button shows "Use Education - Course Listings (semantic Mode) & Continue"
- When Hybrid is selected: Button shows "Use Education - Course Listings (hybrid Mode) & Continue"
This ensures you know exactly which search configuration will be applied to your store before proceeding.
Action Buttons:
| Field | Description | Requirements |
|---|---|---|
| Use Sample Dataset | Proceed with the selected sample dataset and continue to next step | Sample dataset must be selected first |
| Import My Own Data | Skip sample data and proceed to upload your own custom dataset | Available as alternative option |
Step 4: Data Import Confirmation
After selecting a sample dataset, the system processes and imports the data:
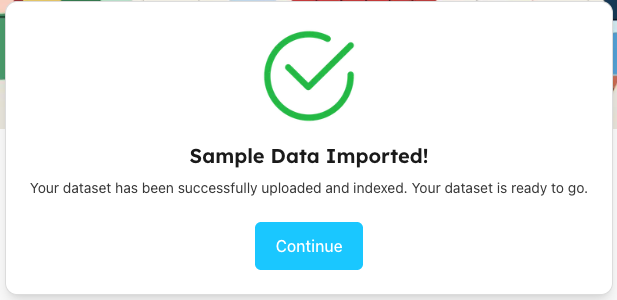
Import Process:
- Data Upload: Sample dataset is uploaded to your store
- Indexing: Data is processed and indexed for search optimization
- Validation: System confirms successful data integration
- Ready Status: Store is prepared for configuration steps
- Continue button becomes active
Step 5: Design Your Search Display
Configure how search results will appear to your users:
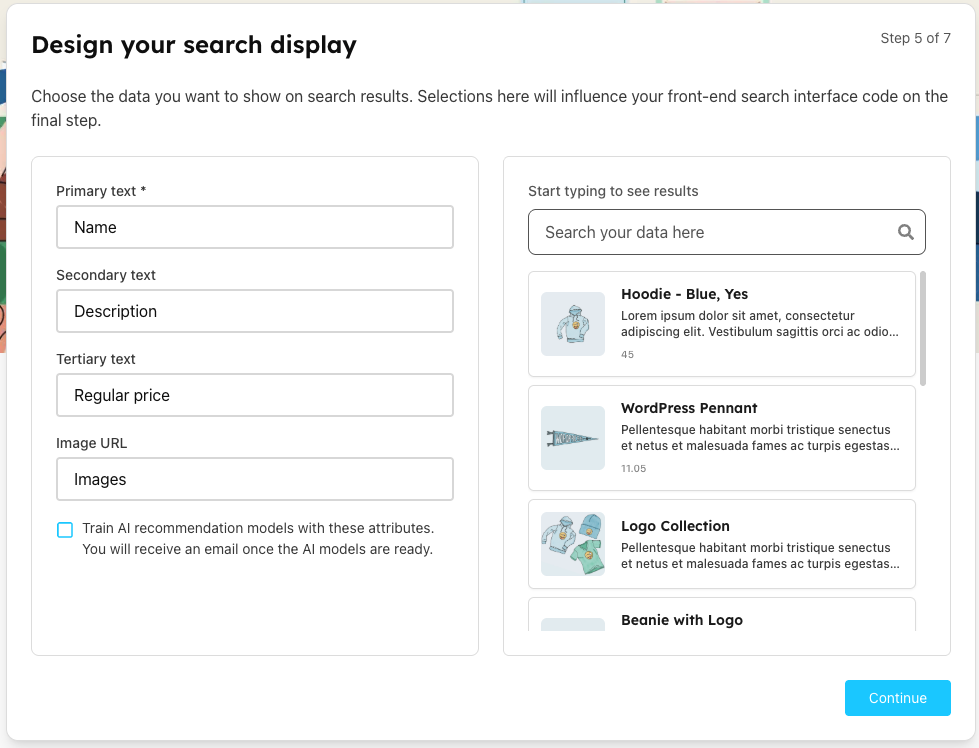
Display Configuration Fields:
When you reach this step, the fields will be pre-populated based on your imported data. Here's what you'll see in the UI and how each field affects the search result display:
| Field Type | Visual Appearance | What You'll See |
|---|---|---|
| Primary Text * | Large, prominent heading - Most visible text in search results | Field will be highlighted and pre-selected. *Required field that users see first |
| Secondary Text | Medium-sized text - Supporting information below primary text | Pre-filled with relevant data attribute. Smaller than primary text but clearly visible |
| Tertiary Text | Small, informational text - Additional details like price, ratings, or metadata | Smallest text size, appears as subtle information below other text elements |
| Image URL | Visual thumbnail - Image displayed alongside text content | Pre-selected if image data is available in your dataset |
Live Preview:
- Real-time Updates: Changes reflect immediately in the preview panel
- Sample Results: Shows how actual search results will appear
- Interactive Testing: Search functionality works in preview mode
- Visual Feedback: Ensure optimal user experience before finalizing
AI Recommendation Training:
- Train AI recommendation models with selected attributes
- Benefits: Enhanced search relevance and personalized results
- Process: AI models learn from attribute selection and user interactions
Step 6: Configure Search Attributes
Define which data fields users can search through:
Default Search Attributes:
Based on your display configuration, these attributes are automatically included:
- Name - Primary searchable field
- Description - Secondary searchable content
- Regular price - Pricing information
- Images - Visual content metadata
Additional Available Attributes:
- Categories - Product or content categorization
- Grouped products - Related item collections
- Sale price - Promotional pricing
- Attribute 2 global - Custom business-specific fields
Configuration Options:
| Action | Function | Impact |
|---|---|---|
| Remove Attribute | Click trash icon to remove unwanted search fields | Reduces search scope and complexity |
| Add Searchable Attribute | Click "+ Add Searchable Attribute" to include more fields | Expands search capabilities and findability |
| Live Preview | Test search functionality with current attribute selection | Validates search behavior before finalization |
Best Practices:
- Include attributes users are most likely to search for
- Balance comprehensiveness with search performance
- Consider user search patterns and behaviors
- Test different attribute combinations in preview
Step 7: Configure Result Ordering
Customize how search results are ranked and ordered:
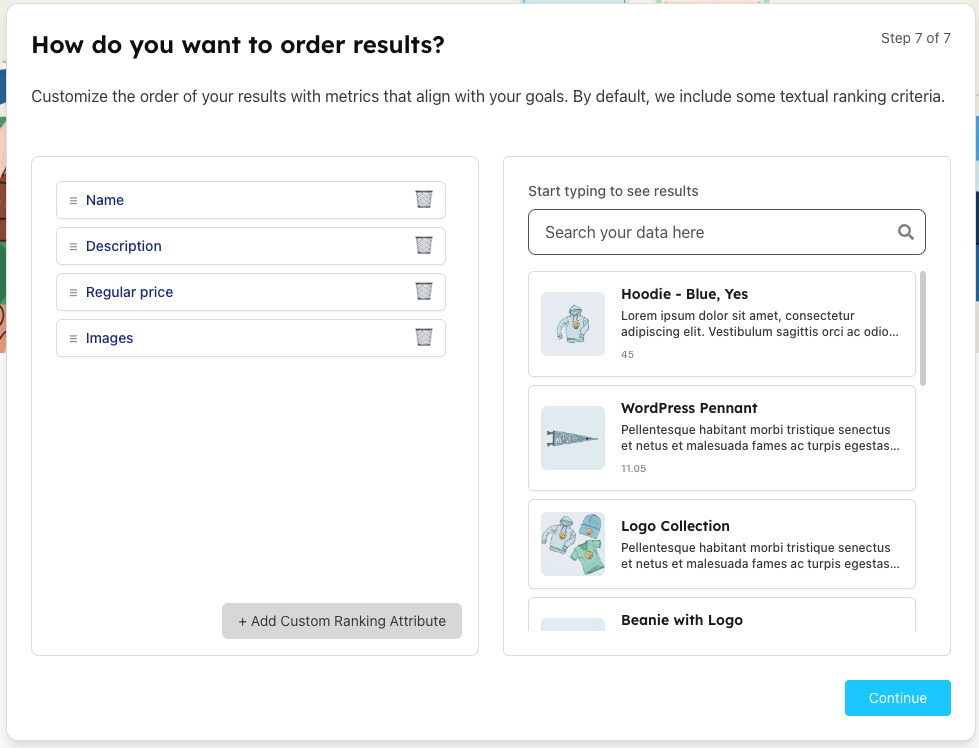
Ranking Configuration:
Default Ranking Attributes:
- Name - Alphabetical or relevance-based name sorting
- Description - Content relevance and match quality
- Regular price - Price-based sorting options
- Images - Visual content priority
Customization Features:
| Feature | Functionality | Impact on Results |
|---|---|---|
| Drag & Drop Reordering | Drag ranking attributes to change their priority order | Higher priority attributes influence result ranking more heavily |
| Remove Attributes | Click trash icons to remove ranking factors | Simplifies ranking algorithm and focuses on remaining factors |
| Add Custom Ranking | "+ Add Custom Ranking Attribute" for business-specific metrics | Incorporates custom business logic into search ranking |
| Real-time Preview | Live preview updates as you modify ranking attributes | Immediate feedback on ranking changes and result order |
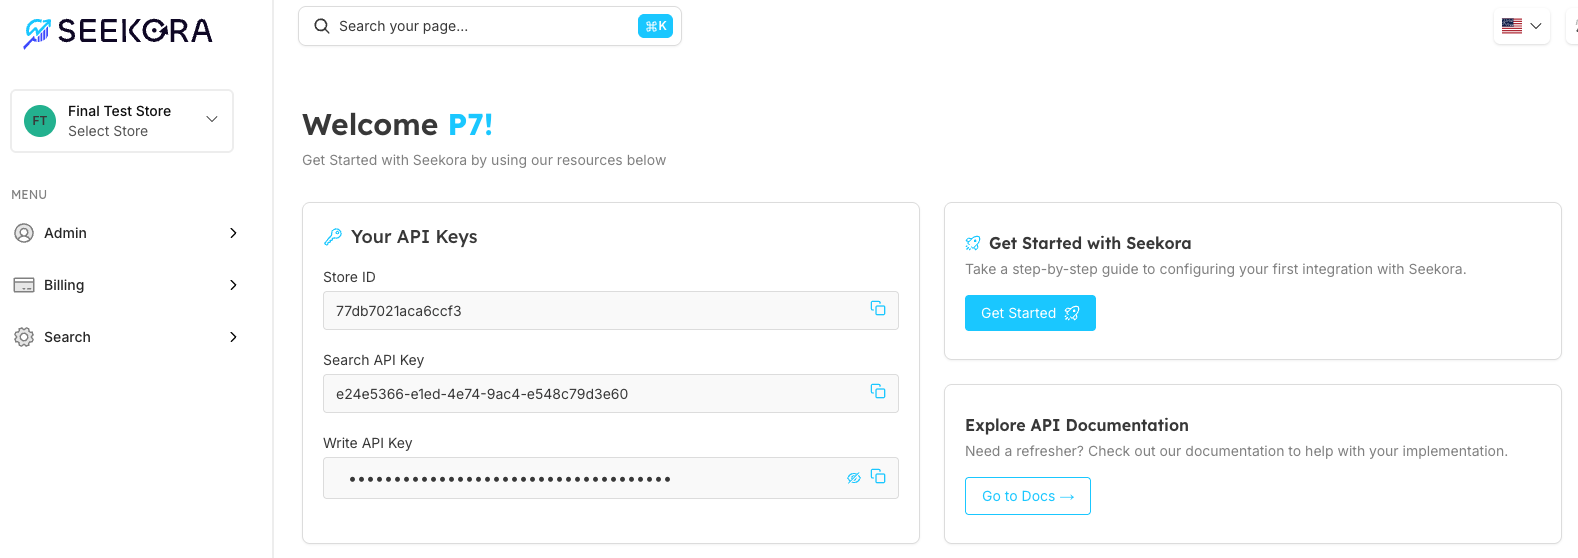
Final Step: API Keys and Welcome
Upon completion, you'll receive your store's API credentials:
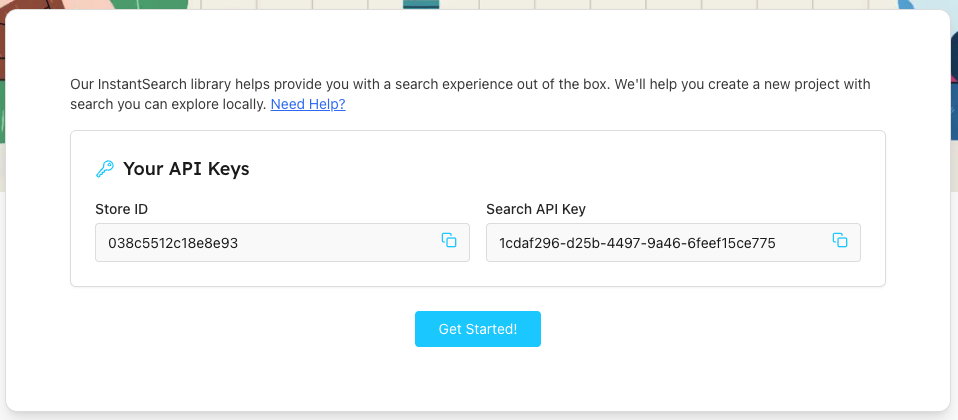
Your API Keys:
| Key Type | Purpose | Usage |
|---|---|---|
| Store ID * | Unique identifier for your store across all API calls and integrations | *Required for all API endpoints |
| Search API Key | Read-only access for performing searches and retrieving results. See Next Steps for integration guidance. | Frontend integration and search queries |
Next Steps:
- Get Started!: Click to begin integrating with your application
- UI SDK: Utilize Seekora's UI SDK for out-of-the-box search experiences
- Need Help?: Access comprehensive documentation and integration guides
Store Creation Best Practices
Planning Your Store Setup
| Best Practice | Implementation | Benefits |
|---|---|---|
| Start with Sample Data | Use industry-specific sample datasets to understand functionality before importing custom data | Quick setup, learning experience, reduced initial complexity |
| Plan Display Fields | Consider user needs when selecting primary, secondary, and tertiary display fields | Optimal user experience, relevant information hierarchy |
| Test Search Attributes | Use the live preview to test different search attribute combinations | Validates search behavior, ensures comprehensive findability |
| Optimize Ranking | Prioritize ranking attributes based on business goals and user behavior patterns | Improved search relevance, better user engagement |
Notes
📌 Important Considerations:
-
Required Fields: All mandatory fields must be completed before proceeding to next steps
-
Sample vs Custom Data: Start with sample data for learning, then create separate stores for production
-
API Security: Store API keys securely and use appropriate key types for different environments
📌 Post-Creation Steps:
- Integration Setup: Use provided API keys to integrate with your application
- Data Import: If using custom data, follow the data import documentation
- Configuration Tuning: Fine-tune search and display settings based on user feedback
- Performance Monitoring: Monitor search performance and user engagement metrics
Frequently Asked Questions
What happens if I skip required fields?
The "Next" button will remain disabled until all required fields are properly filled. The system will highlight missing or invalid fields to guide you through completion.
Can I change configurations after store creation?
Yes, most store configurations can be modified after creation through the store management interface. However, some changes may require re-indexing your data.
What's the difference between sample data and custom data?
Sample data provides pre-configured datasets for quick setup and learning. Custom data allows you to import your own content but requires additional setup steps for optimal search performance.
How do I know which industry to select?
Choose the industry that most closely matches your primary business model. This selection influences default configurations, sample datasets, and optimization settings for your specific use case.
Can I test the search functionality before going live?
Yes, the creation wizard includes live preview functionality at multiple steps. You can test search behavior, result display, and ranking before completing the setup process.
How secure are the generated API keys?
API keys are unique to your store and should be treated as sensitive credentials. Use read-only Search API keys for frontend integration and store Write API keys securely for backend operations.
Can I create multiple stores with the same data?
Yes, you can create multiple stores .To create more stores, you need to upgrade your plan.