Custom Events
Overview
The Custom Events section lets you track merchant-defined events — actions specific to your store that go beyond Seekora's built-in search, click, and conversion events. Where the built-in catalog covers the search lifecycle (Search Submitted, Object Clicked, Order Completed, and friends), custom events capture whatever matters to your business: a checkout completing, a beauty shade being selected, an item added to a wishlist, or any other domain action you care to measure.
Each custom event you define is tracked per store and surfaced in your store analytics. Every distinct event name becomes its own analytics series — its own line on the chart, its own row in the Top Events table — so you can watch each behaviour independently over time. For the broader analytics surface and filtering options, see Overview - Filter Options.
Why Use Custom Events?
Custom events turn store-specific behaviour into measurable, comparable signals:
- Track conversion funnels - Measure checkout steps (e.g.
checkout_completed) to see where shoppers drop off - Capture domain-specific actions - Beauty stores track
shade_selected; fashion stores tracksize_chosen; any vertical can model its own key moments - Measure engagement - Add-to-wishlist, video plays, lookbook opens, "notify me" clicks — anything that signals intent
- Quantify any action - If a shopper can do it, you can name it and count it
- Feed relevance later - The behavioural signal you collect today becomes input for ranking and personalisation as your store matures
Business Impact:
Custom events give you the same rich, time-series analytics Seekora provides for search — but for the actions unique to your storefront. That means you can answer questions the built-in catalog can't, prioritise the features your shoppers actually use, and build a behavioural dataset that compounds in value. Configure User Management access so the right teams can review event performance, and set up Notifications for engagement alerts.
Where to Find It
In the Admin UI, select your store, then open Search → Analytics → Custom Events tab.
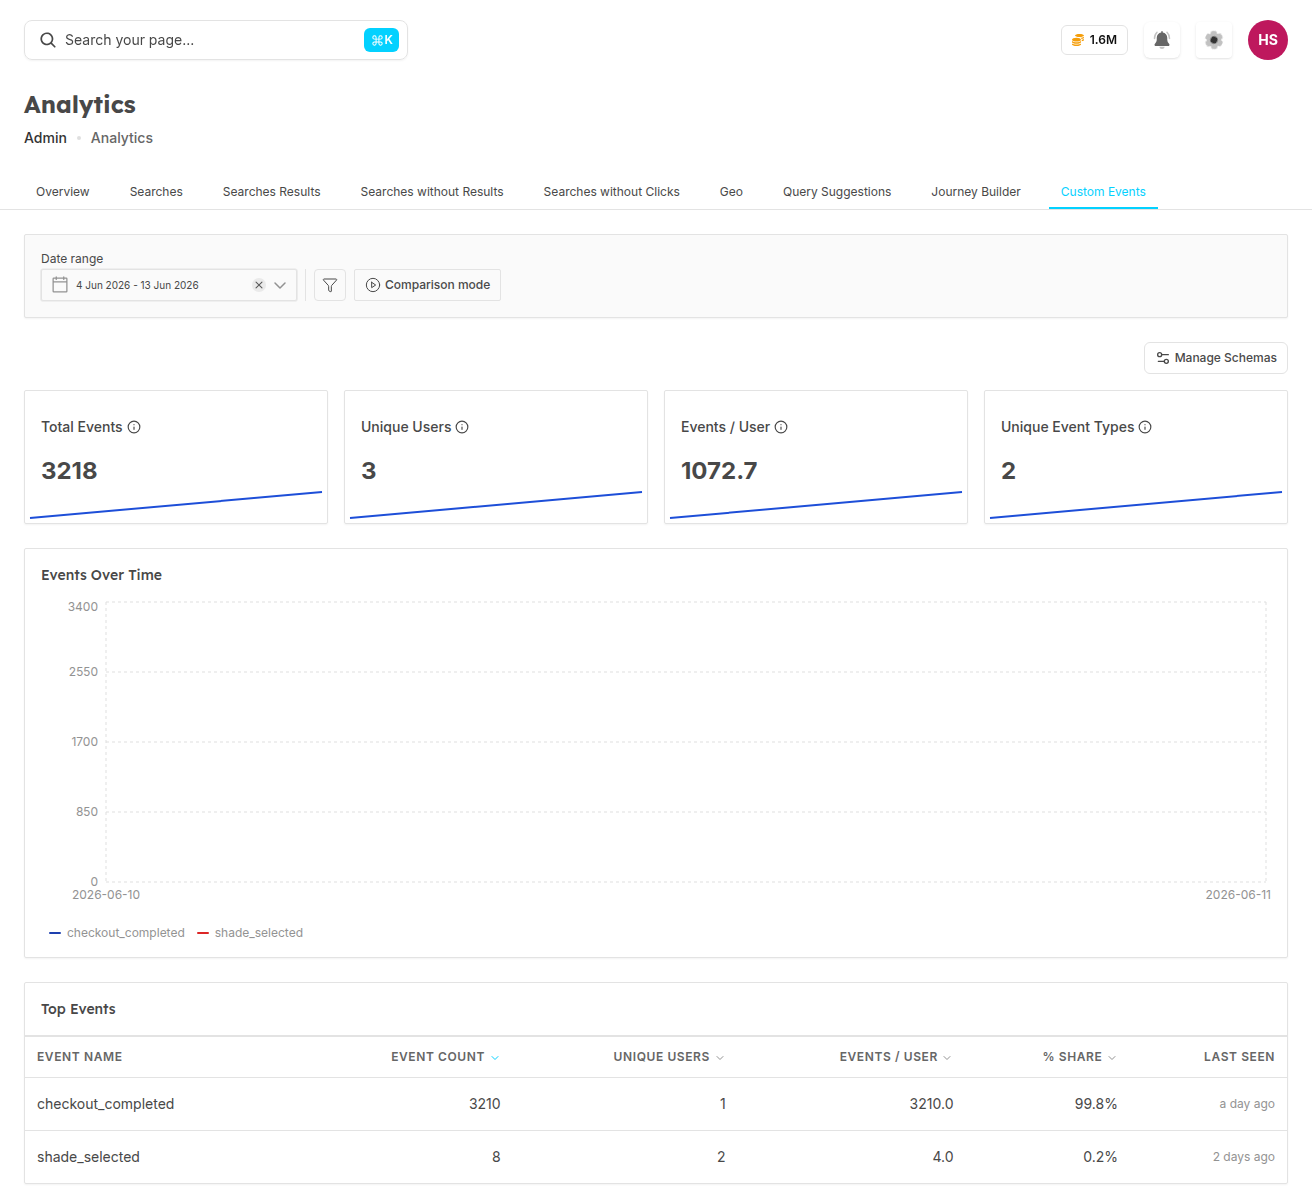
The Custom Events tab is organised into three areas: a row of KPI tiles, an Events Over Time chart, and a Top Events table. A Manage Schemas button (top right) takes you to the event definitions.
KPI Tiles
Events Over Time
The Events Over Time line chart plots event volume across the selected date range. Each custom event name is drawn as its own series, so you can compare trends — for example, watching checkout_completed rise while shade_selected holds steady. Use the date controls to zoom into a campaign window or compare periods.
Top Events Table
The Top Events table ranks your custom events by activity. Its columns:
Defining a Custom Event (Manage Schemas)
Before an event becomes a first-class analytics series with a friendly display name, category, and validation rules, you define its schema. Click Manage Schemas from the Custom Events tab to open the schema list.
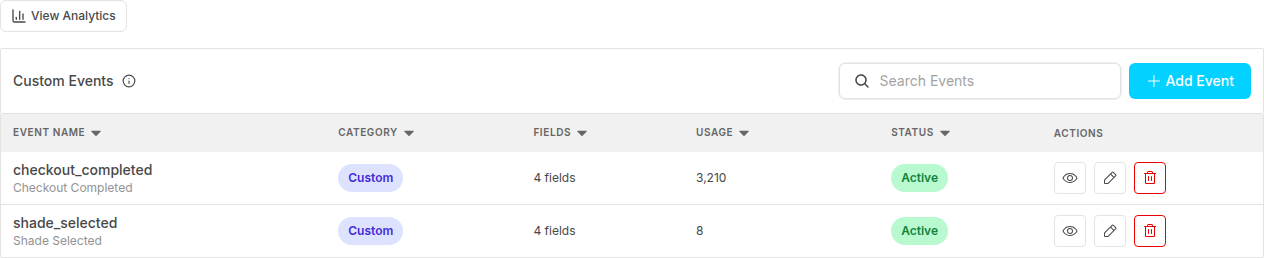
The schema list shows every custom event you've defined. Use the Search Events box to filter, and + Add Event to create a new one. The columns:
In the Lumera Beauty demo store, for example, the list shows checkout_completed (Custom, 4 fields, 3,210 usage, Active) and shade_selected (Custom, 4 fields, 8 usage, Active).
Adding an Event
Click + Add Event to open the Add Custom Event modal, subtitled "Define your custom event schema and validation rules." The modal has three tabs: Basic Info, Event Fields, and Validation Preview.
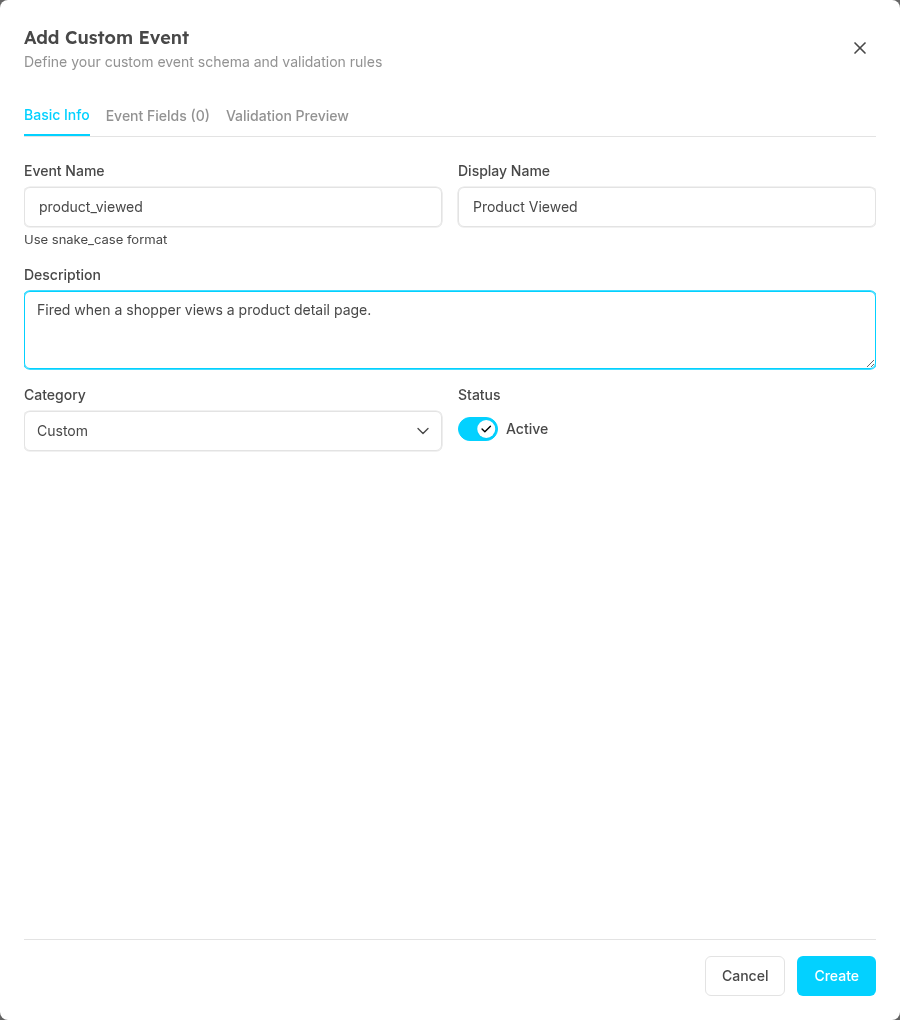
1. Basic Info — define the event's identity:
- Event Name — the snake_case identifier you'll emit from code, e.g.
product_viewed. The helper text reminds you to "Use snake_case format." This name is the discriminator: it becomes the event's series on the chart and its row in the Top Events table. - Display Name — a human-friendly label shown in the UI (e.g. "Product Viewed").
- Description — a short note on what the event represents and when it fires.
- Category — the grouping label (e.g. Custom).
- Status — the Active toggle; leave it on so the event is tracked.
2. Event Fields — define the properties the event carries (the keys you'll pass in properties when emitting). Each field has a name and type so the schema knows what to expect.
3. Validation Preview — review how an incoming event will be validated against the schema you've defined, so you can confirm the shape before going live.
When you're done, click Create (or Cancel to discard). The new event appears in the schema list and starts collecting data as soon as you begin emitting it.
snake_case is required. Event names must use snake_case (lowercase words separated by underscores). Because the event name is the analytics series discriminator, keep it stable — renaming it later starts a new series rather than continuing the old one.
Emitting Custom Events
Once a schema exists, emit the event from your storefront or backend. There are three ways to do it, depending on whether you have a JavaScript runtime.
Via the search-sdk
The @seekora-ai/search-sdk package exports trackCustomEvent for any event name that doesn't have a dedicated built-in helper:
trackCustomEvent(
  ctx: TrackContext,
  eventName: string,
  properties?: Record<string, unknown>
): void
ctx carries the Seekora analytics instance (window.SeekoraAnalytics, set up by Seekora's storefront snippet) plus your orgcode and xstoreid. See Analytics → Configuration for how to fetch your writeKey and the analytics ingest host.
import { trackCustomEvent } from '@seekora-ai/search-sdk';

// Seekora's storefront snippet exposes the analytics instance as
// window.SeekoraAnalytics. Build the tracking context once and reuse it.
const ctx = {
  analytics: window.SeekoraAnalytics,
  orgcode: 'YOUR_ORG_CODE',
  xstoreid: 'YOUR_STORE_ID',
};

// Lumera Beauty: a shopper picks a foundation shade
trackCustomEvent(ctx, 'shade_selected', {
  product_id: 'SKU123',
  shade: 'warm-beige',
  category: 'foundation',
});

// A general product-view example
trackCustomEvent(ctx, 'product_viewed', {
  product_id: 'SKU123',
  category: 'lipstick',
});
Two rules on
eventName:
- It must be non-empty.
- It must not collide with a reserved built-in event name. Built-in events (search submitted, object clicked, order completed, and so on) each have their own named helper — for example
trackObjectClicked. Use those helpers for built-in events and reservetrackCustomEventfor your own names.
Via the ui-sdk
The @seekora-ai/ui-sdk-react package (and the underlying core) re-exports trackCustomEvent from the search-sdk — same signature, same behaviour. If your app already depends on the UI SDK, you can import it from there without adding the search-sdk directly:
import { trackCustomEvent } from '@seekora-ai/ui-sdk-react';

trackCustomEvent(ctx, 'checkout_completed', {
  order_id: 'ORD-4821',
  total: 79.0,
  items: 3,
});
The ctx is the same TrackContext. If you've mounted <SearchProvider trackContext={...}>, reuse that context value for your custom events so everything routes to the same tenant and store.
Direct ingest (no JS runtime)
If you don't have a JavaScript runtime — a server in another language, a backend job, or a webhook handler — POST a Segment-Spec track envelope directly to the Seekora analytics ingest endpoint at /v1/b. Your writeKey goes at the top level of the body (there is no Authorization header on this surface). Pull your writeKey and ingestHost from Analytics → Configuration.
curl -X POST 'https://analytics-ingest.seekora.ai/v1/b' \
  -H 'Content-Type: application/json' \
  --data-raw '{
    "writeKey": "<your-events-write-key>",
    "batch": [
      {
        "type": "track",
        "event": "checkout_completed",
        "anonymousId": "<your-anonymous-id>",
        "messageId": "<unique-uuid-per-event>",
        "timestamp": "2026-06-12T14:50:00.000Z",
        "properties": {
          "order_id": "ORD-4821",
          "total": 79.0,
          "items": 3
        },
        "writeKey": "<your-events-write-key>"
      }
    ],
    "sentAt": "2026-06-12T14:50:00.500Z"
  }'
A successful response is {"ok":true,"okEvents":1,"receivedEvents":1} with HTTP 200. The event field carries your snake_case custom event name; only event and properties change between events. For the full ingest reference — batching rules, required fields, and more examples — see Analytics → Configuration.
Viewing Results
After you start emitting an event, head back to the Custom Events tab. New events appear in the Top Events table and on the Events Over Time chart within minutes of the first occurrence. A few things to watch:
- Unique Event Types ticks up by one the first time a brand-new event name arrives — a quick confirmation that your wiring works.
- % Share shows how your new event compares to existing ones; a freshly launched event starts small and grows as adoption increases.
- Last Seen in the Top Events table is the fastest way to verify the most recent occurrence actually landed.
If an event you defined isn't showing up, confirm its schema Status is Active, that the Event Name in your emit call exactly matches the snake_case name in the schema, and that you're pointing at the correct ingestHost for your environment.